I originally bought this lemon print poplin to make a dress for The New Craft House summer party back in August, which had an Italian Riviera theme. The only problem was, I didn't like it - I wasn't sold on the quality of the cotton or how, erm, yellow the lemons were!

Fast forward a couple of months and I couldn't be happier that I had a change of heart.


It's all thanks to a good friend of mine getting married in Italy - Tuscany to be precise. The night before the wedding, the lovely couple hosted a welcome dinner and I wanted to wear something a little 'extra' for the occasion. I figured it was better to do it then, than to distract people with an extravagant outfit on the actual wedding day.

I dug this fabric back out and was immediately drawn to the Deer and Doe Myosotis Dress pattern...a match made in heaven. 


Unlike my first and second version, I lengthened the skirt piece for a midi look this time. I'm not sure I nailed the length, but it's grown on me (pun fully intended) since the wedding. 

Once again, I added waist ties for extra shaping and I omitted the mandarin collar. I really, really love this cleaner neckline on me. To realise my over-the-top Italian dress vision, I chose the biggest, baddest, goldest buttons in my stash.


I don't normally share location photos as I'm too self-conscious to take them, but a Tuscan backdrop was too hard to resist. This dress got SO many compliments on the night, which helped to resolve any reservations I had about it. It was a slow burner, but I think it's true love.


Happy Halloween, friends! I made myself a subtle little dress for the occasion, which I can wear all year round, because I don't actually have any trick or treat/party plans. 

My idea started taking shape when What Abi Makes shared this glimpse of the dress she made with what she called 'accidental Halloween fabric'. I tracked down the very same viscose for a bargain from Higgs & Higgs, which has the cutest black cat and tiny paw print. 

With a loose Wednesday Addams aesthetic in mind, I decided that the Friday Pattern Company Wilder Gown could fulfil my high neck, mini dress vision. I couldn't be happier with the outcome!


My favourite touch is my hacked sleeves. To get the shorter length dress I was after, I had to cut 8cm off the skirt before adding the ruffle. Given that the neckline detail is one of my favourite things about this pattern, I decided to put the excess fabric to good use and replicate that detail on the sleeves. 

To achieve this, I just followed the same instructions I did for the neckline. Because this was an afterthought, I had to unpick part of the sleeve seams and topstitch the finished edges down first. To do this from the get-go, just apply the front bodice seam instructions to your sleeve seams, then follow the neckline instructions for the rest. 


Being a bit of a perfectionist, I decided to anchor my neckline tie so that the gathers and tie ends are always even. I tried the dress on, arranged my gathers how I wanted them and pinned the tie in place at the centre back and front sleeve seams within the channel for the tie. I then stitched along those three points, which are totally hidden by the gathers. I did the same for the sleeves, adding just one row on stitching at the centre front of the channel. 


Other changes I made were to shorten the ruffle and add elastic to the waist. For the ruffle I folded the skirt piece provided at the lengthen/shorten line. For the elasticated waist I followed the suggested instructions provided in the pattern.

Size-wise I made a straight medium, but would be tempted to add an inch to the bodice length so it's slightly less of an empire shape. The sleeves could also do with some tweaking in future. The way that they're drafted makes the whole dress lift up when you raise your arms, which I think means I need to raise the armholes a little and maybe add length to the bodice side seams.


Minor quibbles aside, I love this dress so much! I'm super pleased with how it turned out and look forward to playing around with this pattern some more.

Are you a Wilder Gown fan?


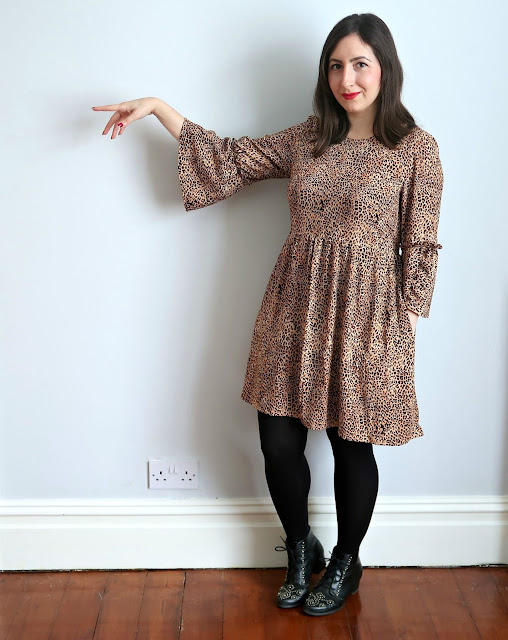
A roaring success - that's what my Tilly and the Buttons Indigo Dress is. Before I delve into the pattern details, can we take a minute to admire the fabric? 

Any animal print lover will agree that finding the 'right' colour and scale print is the holy grail of sewing. This leopard print viscose from Like Sew Amazing (currently sold out, but Sarah has a lovely selection of prints) has body, a bit of stretch, barely creases, and is quite literally perfect.

Right, back to the pattern. Due to the loose fit, I sized down and cut a straight 4, which was a bold move that thankfully paid off. My fit changes were minimal, but made all the difference. 

I added 2cm to the bodice length to accommodate my bust and because I don't really suit an empire waistline. For a 'mini' look, I took 7cm off the skirt length before hemming. To avoid gaping (a common problem for me), I took 2cm wedges out of the front and back necklines. This almost backfired as I can just about squeeze my head through, but there's no gaping sight!


I couldn't resist the exposed frill seam on the sleeves, which is such a pretty detail. However, I was hesitant to add bulk to the waistline, so settled for a classic gathered seam there instead. Maybe next time I'll be braver.


Inspired by fellow stitchers, I added waist ties for a little extra shaping, a feature I've incorporated into all three of my Myosotis dresses too. My finished ties measure approximately 75cm long by 1cm wide. To avoid having another viscose dress I'm terrified of hanging up, I used stay tape to stabilise the shoulder seams, which worked a treat.


I really, really love how this make turned out. A lot of it has to do with the fabric, but I'm also surprised by how much I like the shape too. Just like the Myosotis dress, Indigo has proven to me that going out of your comfort zone can totally pay off.

As soon as I finished my first Myosotis Dress, I started a second one in this sweet gingham crepe from Sew Me Sunshine. What can I say...the Deer and Doe pattern has totally stolen my heart!


Despite loving how extra my red floral version is, I wanted this one to be slightly more wearable and easier to layer during the colder months. To achieve this, I left the ruffles off the sleeves, meaning I can slip a cardigan/jumper on without any fuss. I also omitted the Mandarin collar for a more open neckline and drafted a facing instead.

I kept the tiered, ruffled skirt though, because...duh! I also added waist ties again as I prefer a nipped in waist on my shape. For reference, just like last time, I made a straight size 40.


I didn't think it would be possible, but I love this version even more than my first one. It's the perfect mix of fun and wearable - from days in the office to nights out with friends, it's already on heavy rotation in my wardrobe.

If you're a Myosotis fan, what's your ideal version?

The cat's out of the bag! I auditioned for the part of Robin Buckley in season three of Stranger Things, but Maya Hawke got the callback and the rest is history.

Not really, but my outfit is giving off some serious Scoops Ahoy vibes, don't you think?


I made this Pauline Alice Aldaia Dress months ago and wasn't planning to blog it, given that I have nothing to add about the fit and construction that I didn't already cover when I shared my first, second, third (if my refashion counts), fourth and fifth versions.

That's until I remembered the 1950s-inspired linen collar I made in 2011 (look at my baby face!), using vintage McCall's 1911. It's the perfect companion for my anchor-print jersey from Stoff and Stil and I just couldn't resist a kitsch photoshoot.


Despite loving a nautical look, I haven't been brave enough to wear this collar/outfit in public. Would you wear it out and about? Should I?

I'm back for a second week running, can you believe it? This time I'm sharing my totally rad Libby Shirt, which I made weeks and weeks ago, but only got around to photographing recently. 


As soon as Sew Over It London released this pattern, I fell in love. It's exactly the kind of shirt I go for in RTW styles, so I jumped at the chance to make my own. When I found this geometric print satin from Crafty Sew & So, it was a match made in heaven. I even had the perfect vintage buttons in my stash.


I love the pattern's boxy (but not too loose) shape, grown-on cuffed sleeves and notched collar. Beware of the collar though. Granted, I'd never sewn a notched one like this before, but I found it really tricky and struggled with part of the instructions. Luckily, Sew Over It London has a comprehensive step-by-step tutorial online, which was a life-saver. 

If I remember correctly, I cut a size 12 grading up to a 14 at the hips and I'm really happy with the fit. One thing I would say though, is beware of the straight front hem version because it comes up pretty short. The shirt is a cropped style anyway, but I'm only 5ft 3ins with a particularly short waist, and it's borderline on me. If in doubt, add a little extra length or go for the curved front hem instead.


Despite how fiddly I found the collar, I definitely love this shirt enough to make another. Speaking of love, have you seen Sew Over It's Bonnie Blouse pattern? I'm smitten!

Have you made Libby or Bonnie? What are your thoughts?

It's taken the sewing world by storm, but the Myosotis Dress by Deer and Doe was a slow-burner for me. I was convinced that all the body and flounce of the pattern would swamp my frame, but I couldn't be happier to be proved wrong. 


I have geniuses like Fiona (Diary of a Chain Stitcher) and Bianca (Sleepless in Bavaria) to thank, for giving me the idea of adding waist ties to the dress. Doing so gave me that extra bit of shaping which allowed me to carry off this style.

It's such a romantic silhouette that I felt compelled to pair it with an equally feminine fabric, so I opted for the most gorgeous floral viscose from Fabric Godmother. Sadly, it's now sold out, but Josie has many more beauties on offer. 


A sudden rush of bravery led me to go big or go home, so I plumped for both sleeve and skirt ruffles.  Usually, I hate gathering fabric and avoid it where possible, but this time round it was oddly therapeutic and satisfying. The only fiddly part of construction is the mandarin collar, and admittedly, mine turned out a little uneven. I'm ok with that as my hair covers it 90% of the time, but I'm not a massive fan of that collar style on me and I omitted it for my second version - yep, I've already made  another Myosotis

Due to the pattern's floaty nature, I sized down to a straight size 40 and I'm pretty happy with the fit. It irks me a little that from behind the ties don't sit on the waistline (see pic above) despite lining them up with it on the side seams and I suspect it's because I've used drapey fabric that is weighed down by the ruffles. I could also perhaps narrow the shoulders and shorten the sleeves a touch, but these are just minor quibbles.


Minor quibbles aside, not only do I feel fabulous in my Myosotis Dress, I get SO many compliments when I wear it. Lots of people have even asked me to make them one, which is sweet, but never going to happen...haha!

Are you a Myosotis fan?